

Your tomato plants are tall and green; you’ve taken the time to carefully stake or cage them to support their growth. Right now they are loaded with tons of green tomatoes, and some of them are just starting to blush red. And then three days later, it all goes horribly wrong.
There is nothing more disheartening than to see that all of your ripening tomato beauties (or peppers, or squash…) are now rotting from the bottom—right on the vine!
This article contains affiliate links. As an Amazon Associate I earn from qualifying purchases.
What is Blossom End Rot?
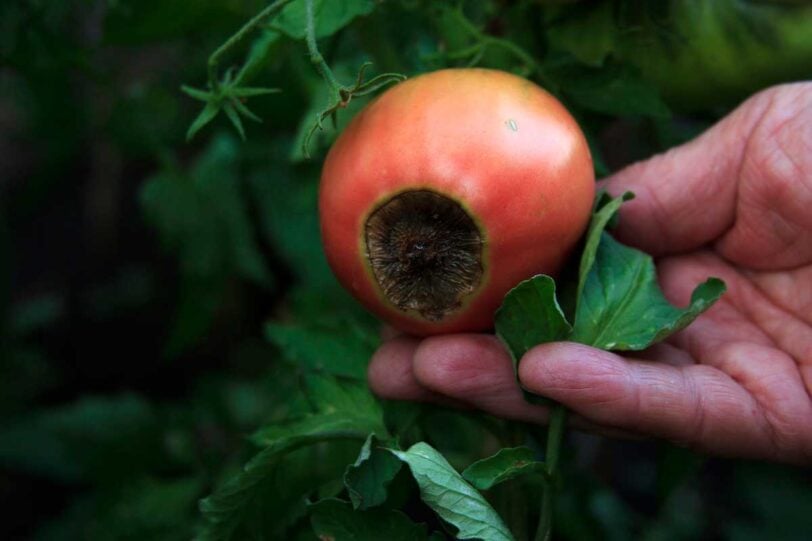
Blossom-end rot looks like a discolored, watery, sunken spot at the blossom end of the fruit. It affects tomatoes most commonly, but can also affect peppers, eggplants, squash, cucumbers, and melons, too. The spot will start out small, and grow larger and darker as the fruit continues to grow.
Blossom-end rot can quickly cover half the fruit, making it totally inedible. Secondary diseases or mold can also form on the affected areas, overtaking the entire fruit and ruining the harvest.

What Causes Blossom End Rot?
Blossom-end rot is a disorder caused by calcium deficiency in the plant.
While this may be a result of low calcium levels in the soil, more often than not, it is the result of erratic watering.
Calcium deficiency is more common if your garden experiences extremes in soil moisture levels—either too dry or too wet.
When the plant is allowed to get too dry, or is given too much water over a period of time, its ability to absorb calcium from the soil is greatly diminished. In other words, your soil might have plenty of calcium, but it just isn’t bioavailable and being taken up and utilized by the plant.
The best way to determine if the problem is a lack of calcium in the soil or inconsistent watering is to test your soil.
If your soil is indeed low in calcium (as determined by a soil test), the easiest solution is to add garden lime several times per year, according to the directions on your test results. (Don’t just add lime without testing your soil first, because you might disrupt the optimal pH for growing your crops.)
Over fertilization, especially with high nitrogen fertilizer, can also cause blossom-end rot. Over fertilization can cause such rapid growth that nutrients such as calcium can’t be absorbed fast enough to support that growth. Always soil test before fertilization and fertilize according to the results.
Varieties of tomatoes that produce large fruit tend to be more susceptible to blossom-end rot, while varieties with smaller fruit are less likely to suffer. If you can, choose varieties of tomato that are resistant to blossom-end rot.

Solving Blossom-End Rot
Blossom-end rot is much easier to prevent than it is to cure. Once it has set in, it can be really hard to reverse, but there are a few things you can do that have a good chance of turning things around.
Ensure Consistent Water Supply
If the issue is erratic moisture, here are some tips:
1. Make sure your soil isn’t allowed to completely dry out. The best defense against blossom end rot is a nice, consistent soil moisture level. A soil moisture meter can help with this.
2. As the summer rolls on, it is easy to forget to water the garden regularly. If it is hard for you to be consistent, or if you plan to take a vacation, consider installing a drip irrigation system and a timer. Drip irrigation is a major time-saver, affordable, water-wise and an outstanding disease prevention method because it both keeps soil moisture regular and keeps water (and therefore fungus spores) from getting onto the leaves of your crops.
3. Mulch. By adding a three-inch layer of organic mulch, you can help maintain adequate soil moisture levels, even during dry spells. It is best to add the mulch after your soil has warmed in the spring.
4. Plant susceptible crops (such as tomatoes, melons, squash, peppers, and eggplants) in well-drained soil that has been amended with compost or well-rotted manure. Soil amended with plenty of organic matter will retain moisture better and supply plenty of nutrition (including calcium) to your plants.
Fortify Your Crops at Planting
In addition to making sure you have consistent moisture levels in your soil, you can fortify your plants when you put them in the ground to make sure they get plenty of calcium throughout the season.
Many people test their soil at the beginning of the season, and use garden lime to adjust their garden pH and add calcium, according to test results. This will treat the entire garden. If your soil pH doesn’t need adjusting, you can use gypsum instead of lime to add calcium to the whole garden.
To fortify your tomatoes, peppers, squash, etc. with extra calcium at the time of planting, you can add 2-3 crushed Tums tablets (or other calcium carbonate antacid) to the bottom of each planting hole as you put your seedlings in.
Alternatively you could put a teaspoon or two of homemade eggshell calcium into each hole as you plant. (Some people also add a tablespoon of Epsom Salts at the same time to provide extra Magnesium.)
You can also use store-bought Calcium/Magnesium fertilizers made for tomatoes at planting and throughout the growing season.

Emergency Tactics for Blossom-End Rot
If you already have signs of blossom-end rot, you can make a solution from calcium carbonate antacid tablets, milk and water, and irrigate your plants with it daily to help keep blossom-end rot from destroying more of your crops than it has to. (See recipe below.) This might help turn things around, but isn’t foolproof. Consider it your last-ditch effort.
Don’t bother with the calcium leaf sprays at the garden store that promise to stop blossom end rot. While they can help with other issues related to nutrient deficiency, they cannot stop blossom end rot. For calcium to be effective in preventing or treating this problem, it must come up to nourish the fruit from the roots. The leaves cannot send any calcium to the fruit.
Prevention is really the cure here.

Blossom End Rot Emergency Drench
Equipment
Ingredients
- 10 tablets calcium carbonate antacid
- 1 quart milk
- 3 quarts filtered water
Instructions
- In a large container that can hold at least one gallon of liquid, crush antacid tablets into a powder, and combine with milk and water.
- Mix well until tablets are dissolved. A stick blender can make this more efficient.
- Water your suffering plants daily with the solution to keep blossom end rot from destroying more of your crops than it has to.
Recommended in This Article


Preventing Blossom End Rot is the Best Cure
Good, fertile soil and consistent watering can make all the difference in stopping this heartbreaking problem before it starts and ruins your crops. Get your soil tested each spring, and amend it accordingly. Provide extra fertilizer throughout the season. Use drip irrigation to keep the soil consistently moist.
Good luck, Gardener!
Photo credit: Deposit Photos


